This article will not cover the creation of the original media file. Here, we assume you have created your sequence in Adrenaline, marked in and out points, and is ready render a compressed version of your final product.

HD Spots
Selecting the Export Option
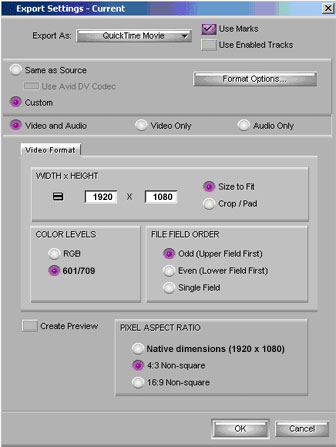
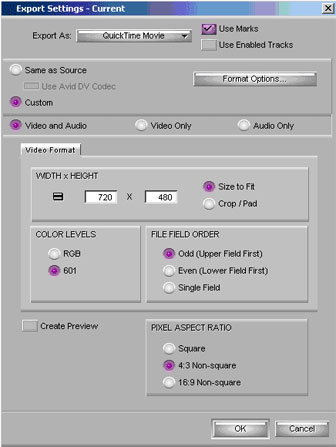
On Media Composer (Adrenaline), select File > Export (or right-click on your time line and select “Export”). For HD, make sure the Export properties screen matches the image below:
Quicktime Settings Overview
Note: This tutorial will cover the use of Quicktime Pro to transcode your finished file into the desired settings. As an alternative to using Quicktime Pro, you may instead generate (export) a Quicktime Movie or a Reference File and save it to your Desktop, and then drop that file into another transcoding application such as Apple Compressor or Sorenson Squeeze.
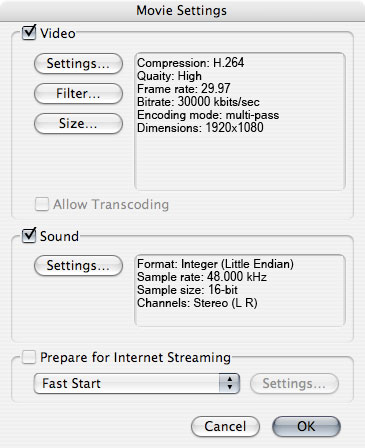
The image below represents our recommended settings. Make sure the checkboxes for Audio (Sound) and Video are checked. Uncheck the option entitled Prepare for Internet Streaming. Next we will go through the preferred Audio and Video settings.

Audio Settings
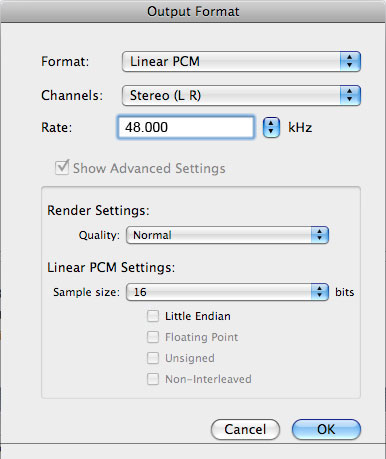
Click on the “Settings” button within the Audio (Sound) section.
Make the following changes to the audio settings (audio sample size can be set to either 16 or 24) and then click “OK” to return to the image shown on section 3.

Video Compression Settings
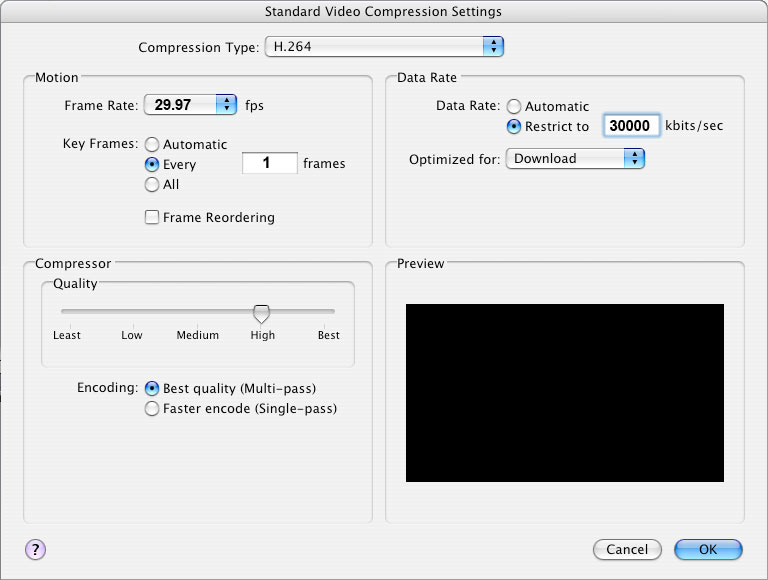
Click on the “Settings” button within the Video section.
Make the following changes to the compression settings and then click “OK” to return to the image shown on the overview section.

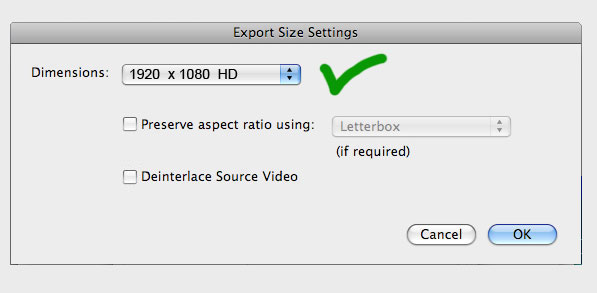
Export Size Settings
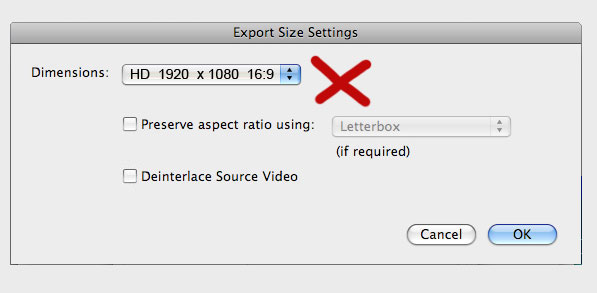
Click on the “Size” button within the Video section.
Make the following changes to the settings and then click “OK” to return to the image shown on the overview section.

Generate the Final Output
On the “Movie Settings” screen, verify that all settings match the settings on Section 3 and click on “OK.”
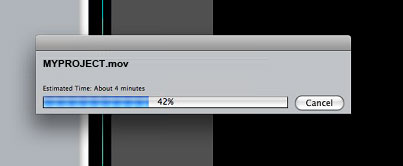
Give your final output a name and click “Save.” Final Cut Pro will now generate an H.264 file using the settings specified above.
(Optional) Checking Your File Using Quicktime’s “Movie Inspector”
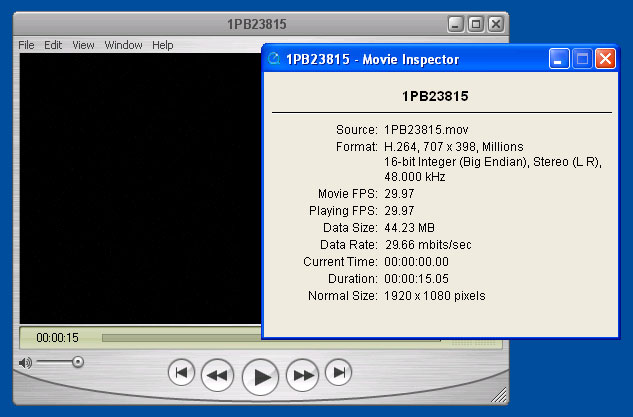
If you are not sure about the file you just created, it may be a good idea to open it up in Quicktime (Mac or PC) and open the Movie Inspector Window ( Window > Show Movie Inspector ).
As you play your video, the “Normal Size” property should remain at 1920×1080 and the “Movie FPS” property should remain at 29.97. Please take note of all other properties as well, and make sure “Data Rate” (bit rate) remains close to 30 mbits/sec.

SD Spots
Selecting the Export Option
On Media Composer (Adrenaline), select File > Export (or right-click on your time line and select “Export”). For SD, make sure the Export properties screen matches the image below:
Quicktime Settings Overview
Note: This tutorial will cover the use of Quicktime Pro to transcode your finished file into the desired settings. As an aternative to using Quicktime Pro, you may instead generate (export) a Quicktime Movie or a Reference File and save it to your Desktop, and then drop that file into another transcoding application such as Apple Compressor or Sorenson Squeeze.
The image below represents our recommended settings. Make sure the checkboxes for Audio (Sound) and Video are checked. Uncheck the option entitled Prepare for Internet Streaming. Next we will go through the preferred Audio and Video settings.
Audio Settings
Click on the “Settings” button within the Audio (Sound) section.
Make the following changes to the audio settings (audio sample size can be set to either 16 or 24) and then click “OK” to return to the image shown on the overview section.
Video Compression Settings
Click on the “Settings” button within the Video section.
Make the following changes to the compression settings and then click “OK” to return to the image shown on the overview section.
Export Size Settings
Click on the “Size” button within the Video section.
Make the following changes to the settings and then click “OK” to return to the image shown on the overview section.

Generate the Final Output
On the “Movie Settings” screen, verify that all settings match the settings on the overview section and click on “OK.”
Give your final output a name and click “Save.” Final Cut Pro will now generate an H.264 file using the settings specified above.

(Optional) Checking Your File Using Quicktime’s “Movie Inspector”
If you are not sure about the file you just created, it may be a good idea to open it up in Quicktime (Mac or PC) and open the Movie Inspector Window ( Window > Show Movie Inspector ).
As you play your video, the “Normal Size” property should remain at 1920×1080 and the “Movie FPS” property should remain at 29.97. Please take note of all other properties as well, and make sure “Data Rate” (bit rate) remains close to 30 mbits/sec.