Producing HD Spots
1. Starting a new project and sequence
To start a new project, select File > New > Project.

In this example, we are creating a 1080i (1920×1080) project, but 720p (1280×720) is also a common option in broadcast.
Make sure “Drop Frame” is selected.
The “Starting Timecode” must be set to “00:00:00;00”.
* The semi-colon (“;”) means the timecode is in “drop frame” mode.

Click on “OK” to continue.
2. Exporting
When you are ready to export your project, select File > Share > Export File.

Under “Format”, choose “MXF” (listed under BROADCAST).

Under “Video Codec”, choose “XDCAM EX (35 Mbps)”
Your export seetings should now look like this:

Click on “Next” and choose a location to save your file.
Producing SD Spots
1. Getting Started
Jump to
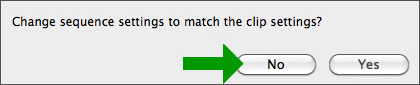
This article will not cover the creation of a sequence in Final Cut Pro. However, the sequence must be set to a frame rate of 29.97 frames per second with progressive scan (not interlaced).
When clips are imported into Final Cut Pro do not allow the sequence to be modified in order to match the clip’s settings.
2. Selecting the Export Option
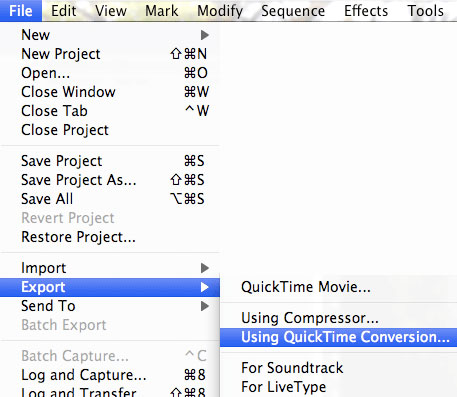
Click on File > Export > Using Quicktime Conversion
Pick Format: QuickTime Movie.
3. Settings Overview
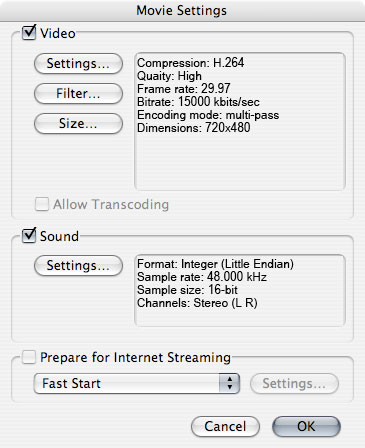
Click Options.
The image below represents our recommended settings. Make sure the check boxes for Audio (Sound) and Video are checked. Uncheck the option entitled Prepare for Internet Streaming. Next we will go through the preferred Audio and Video settings.
4. Audio Settings
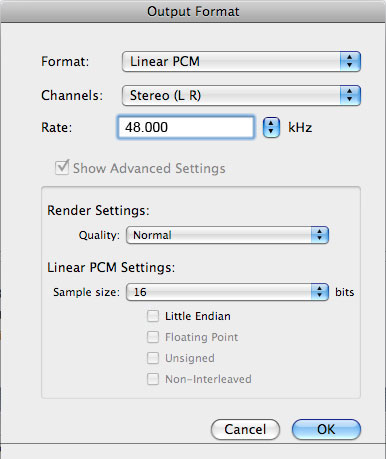
Click on the “Settings” button within the Audio (Sound) section.
Make the following changes to the audio settings (audio sample size can be set to either 16 or 24) and then click “OK” to return to the image shown on section 3.
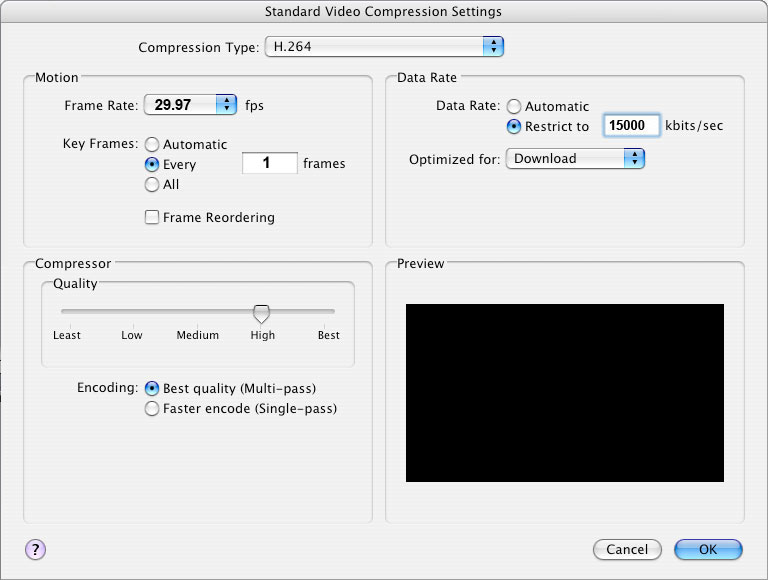
5. Video Compression Settings
Click on the “Settings” button within the Video section.
Make the following changes to the compression settings and then click “OK” to return to the image shown on section 3.
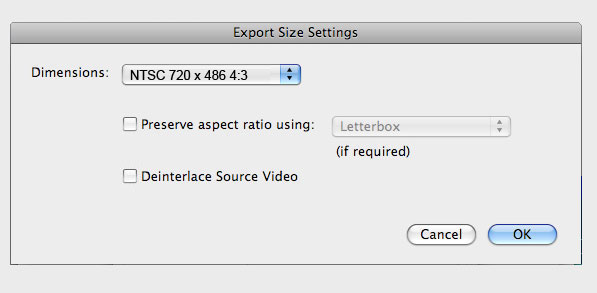
6. Export Size Settings
Click on the “Size” button within the Video section.
Make the following changes to the settings and then click “OK” to return to the image shown on section 3.
Tip: If you included interlaced clips in this project, you probably want to select the “Deinterlace” option since you are about to generate a progressive output.
7. Generate the Final Output
On the “Movie Settings” screen, verify that all settings match the settings on Section 3 and click on “OK.”
Give your final output a name and click “Save.” Final Cut Pro will now generate an H.264 file using the settings specified above.